And if you are one of those who like to boast that your car is only washed when it rains, and the carpets have long inhabited endemic species, it is not worth reading on; but if you are curious to know how you can get your everyday car to be impeccable in ten years, you might be interested in this article. Let me tell you, it's not as complicated as it might seem.
Apprentice detailer
I'll start by admitting that I'm actually just an apprentice detailer, and that I only know the most basic techniques, because when my car needs a "serious" treatment I go to a professional. But as the most important thing -and later I will clarify the reasons- to keep a car impeccable is to use a proper method when washing it, and that is within the reach of anyone, I thought it's worth that at least you know it, then, apply it or not, will depend on each one, but as they say "knowledge takes no place".
To me this kind of hobby came to me suddenly, just when I released my first MX-5. I guess because it cost me so much to have it, and I liked it so much, I wanted from the beginning to keep it always as the day I released it, and I began to investigate, learn and develop careful washing methods.
The most important thing is to wash the car well?
Yes, and when I say "wash it well", I don't mean "clean it well", I mean wash it without damaging it. Keep in mind that the paint is much "softer" than you think, and scratches extremely easily, so anything we rub against it, or rubbing the dirt we want to remove, can cause damage and loss of brightness in the paint. In fact, to keep the paint in good condition, it is best to avoid washing the car incorrectly, and do it only when we can wash it with the necessary care, although of course, if in addition to carefully, you do it often, so much the better.
This way you will ruin the paint of your car
- Tunnel wash: Undoubtedly, the most effective, because once is more than enough to leave your car full of swirls (those micro-scratches so difficult to remove) because ALL tunnel washes with rollers or chamois strips damage the bodywork, which are whipped mercilessly... There are "contactless" tunnel washes, which work with pressurized water, and in theory, do not damage the bodywork, but do not clean better than a car wash with a pressurized water lance.
- High pressure washing: In reality, and if we keep the lance at a safe distance, pressure washing does not damage the paintwork. The problem appears when we "dry" or "go over" the car afterwards. Why? Well, because the water pressure does not get rid of 100% of the dirt, and that dirt includes dust, which is very abrasive. Okay, the dirt that remains is very little, but enough to cause micro-swirls (or even some important swirls) when rubbing it with the cloth all over the bodywork. When we can not wash the car as I explain below, there is no problem to use the pressure hose, but in that case, only dry the windows, and let the rest of the body to air dry. The result is not perfect, but at least we will not damage the puncture.
- Home washing with hose, bucket, and sponge "from the Chinese": Actually, it is the "less bad" procedure, but it also damages the paint. The problem is that -especially if the car is very dirty- we can scratch the paint by rubbing the dirt on the bodywork, and in addition, the "Chinese" sponges can be quite aggressive...
Well, if you have come this far, I imagine that you must feel some interest, because I recognize that this article is becoming a real brick, but before getting to the point, and explain the ideal procedure for washing the car, I will indicate the materials that we will need, the reason for the two buckets, and at the end of all, an alternative procedure for washing the car in a car wash, using a single bucket, and even a more basic procedure, for which you will not need a bucket.
Utensils we will need
- Soap: I recommend buying it in any detailing shop, and if you don't have one in your city, you will find some serious online shops in Spain. Which soap to buy? If you buy it in a detailing shop, the cheapest one will do. Leave the more expensive ones for the more sybarites, they are not worth it for the beginner.
- Sponge or mitt: The natural wool ones are great, and they are super-soft. They have the disadvantage that you have to rinse them well after each use, and then, do not let them dry in the sun, or keep them wet. On the other hand, because they are so soft, some rough-textured plastics don't get very clean. The microfiber ones are a good option, but you have to buy a good one, as soft as possible, and when using them, keep them well soaked, and rinse them more frequently.
- Cheap" glove for the wheels, one of those that are sold in the big supermarkets.
- Drying towel: It is a good investment, as it makes drying much easier, and they last for many years, although to start with, you can also dry your car using several microfiber cloths.
- Microfiber cloths: As it's not a question of free advertising, but I know some that are great, and come out for an incredible price, I'll tell you that they are sold in a supermarket chain called "Mxxxxxxxa", and they come in packs of three, with different colors. Buy at least three packs!
- Window Cleaner: Buy it at a detailing store, it's worth it.
- Quick Detail: This is a mild cleaner, which adds lubricating agents and although it is not absolutely essential, it is great to go over those traces that leave some drops when they dry, to give a final review and leave your car "contest", or to remove those little gifts that the birds leave us. Buy it in detailing shops.
- APC: All Purpose Cleaner, a product that is great for cleaning dirt from interior plastics or fabrics. Buy it at detailing stores.
- Interior cleaner/conditioner: It's not essential, but if it's a quality one, it leaves the interior with a nice finish. In any case, I strongly recommend you to buy it in a detailing shop, as the ones sold in the big stores are too shiny, and sometimes have silicone.
As a general observation, and except for the microfiber cloths and some other things, I recommend that you use the products of economic range of detailing shops, as they are not more expensive than those of the big surfaces, are of good quality, and last a long time. In this sense, I advance you that in general, you have to use very little amount of product to get good results.
For an "ideal" wash, we will need two buckets: one with soapy water, and another with water without soap. The basic idea is to have a second bucket with non-soapy water, which is used to rinse the glove or sponge after washing one panel, and before soaking it again with soapy water for the next one. This way, we make sure that the bucket of soapy water and the glove/sponge are always clean of particles that could scratch the car. Not going to be able to use the two bucket method? Don't worry, I'll explain some alternative methods below, using just one bucket, or even no bucket at all.
Safety first, so I prefer to start by vacuuming when the floor and car are dry, and then wash the car. I leave the interior to the end. For the wheels, the ideal would be to have a third bucket, and in that case, it is advisable to start with them, but in this article I will consider that we do not have it, so we will leave the wheels (which get very dirty bucket water) for the end.
First step: soaking the car and prepare the buckets
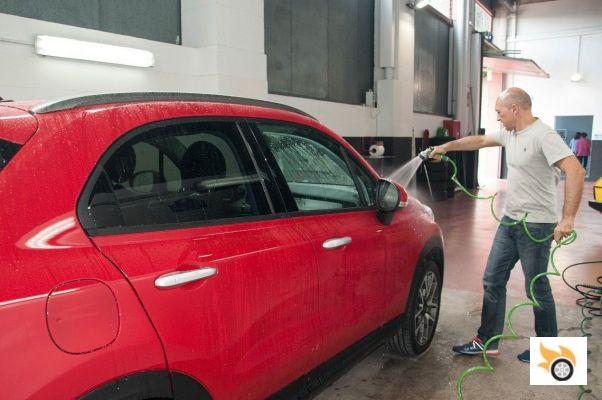
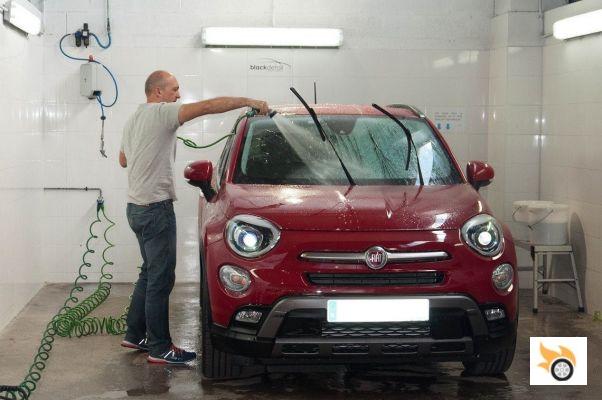
Once the car is vacuumed, we will soak it with a hose, insisting a little if it is very dirty, to try to remove some of the dirt, mostly to minimize subsequent risks when scrubbing stuck mud. We will prepare the buckets with water. In the bucket with soapy water (on the left in the photos) we will put only enough water, and we will add the amount of soap indicated by the manufacturer, and the rinsing bucket we will fill it quite full. You will see in the photos that the rinse bucket has a red grit-guard. It's to keep the dirt at the bottom of the bucket. I admit, this is quite PR0...
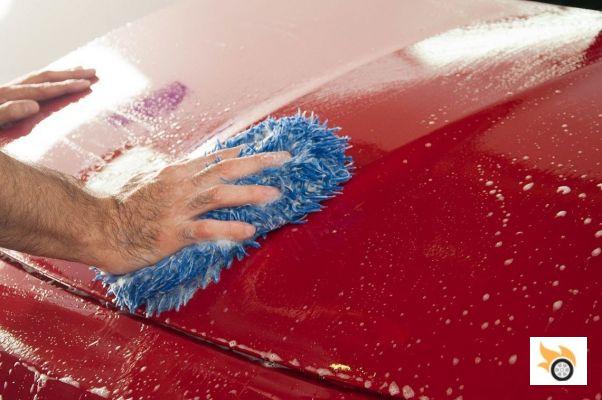
Second step: bodywork soaping
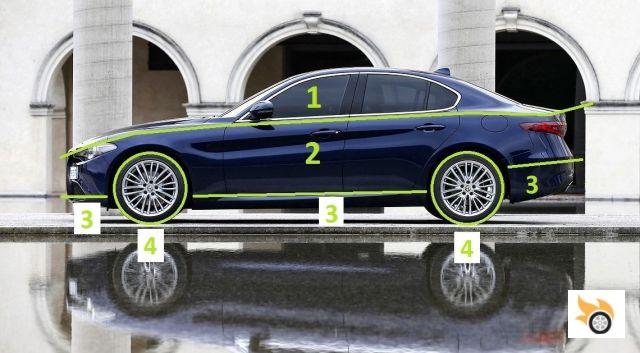
It's very easy: just soak the glove or sponge as much as possible, and start from top to bottom, cleaning the areas as indicated by the number in the photo. Do not rub hard, just slide the glove gently, so that the dirt comes off the bodywork. We will wash one pane (or a few panes) at a time, so when the glove is no longer soaked enough, we rinse it in the bucket of clear water, wring it out a little, and soak it again in the bucket of soapy water.
We wash from bottom to top for two reasons: Firstly, the car is usually dirtier on the bottom and rear, and secondly, any small swirl that could cause a dirty water, will always be less visible on the bottom of the car. If the underbody is very dirty, we must be careful, and have the glove well soaked, moving it gently, without pressing. Throughout the process, be careful not to touch the inside of the fender or tires, as they are usually dirtier, and you know, it is not a matter of rubbing the dirt on the bodywork...
Third step: rinsing the bodywork
Before washing the wheels, we will rinse the bodywork, to prevent the soap from drying, which could leave marks. As for the soaping, we'll go from top to bottom, and with a little practice we won't need too much water.
Fourth step: wheel soaping
For the wheels, we will use a cheap microfiber glove, it is more comfortable, we will reach the corners better, and incidentally, we will keep the "expensive" glove of the body in good condition. We will also go over the tires a little, it costs nothing, and it is an important detail, because there is no use wearing an impeccable suit if you have dirty shoes...
Depending on the design, the rims can be very difficult to clean, but in any case, a rim brush like the one in the pictures is great to clean them, and if we use it with some regularity, we will keep the throat always clean. It seems silly, but a clean throat helps to keep the car looking "new". The brush can also be used to clean the fenders a bit, another detail that makes a difference, and that helps to get that new look that is cool... I will always remember a friend who says that there are two types of men: those who clean the inside of the fenders, and those who do not.
Fifth step: wheel rinsing
If the bodywork had dried, we will soak it again when we rinse the wheels, and we will have the car ready to dry it.
Sixth step: drying
If we have a drying towel, we will start extending it over the hood, to pull it, and we will repeat the process for the horizontal areas of the body. The slight halos that may remain will not leave visible marks, but as the towel gets wetter, it will dry less and less, so it may be necessary to go over with a microfiber cloth after passing the towel, it all depends on the size of the car. The vertical areas will dry in the same way, being careful to avoid the towel rubbing against the wheels, fenders, or touching the floor.
If we do not have a drying towel, we can use the method of two cloths (method patented by me, but I will gladly yield to all the pistonudos) for which we will actually need between four and six microfiber cloths: We will start by taking two cloths, which we will fold twice (this of folding it twice, will be a constant, because we will take advantage of eight sides in each cloth) and first we will dry a panel with the first cloth, as it will not be perfect, we will go over it with the second cloth (which will be drier), so that the panel will be well dry and without halos.
We will proceed in the same way with the rest of the panels, and when we notice that the first cloth is too wet, we will remove it. Then, the old "second" cloth (which will already be a little wet) will become the first cloth, and we will take a new and dry "second", and so on until the whole car is dry ... I know, explained in this way seems as complicated as when the Marx brothers explained the "the contracting part of the first part ...", but, in reality, it is not so complicated; it is just dry first with a cloth, and go over with a second that will be drier, removing them when they are too wet.
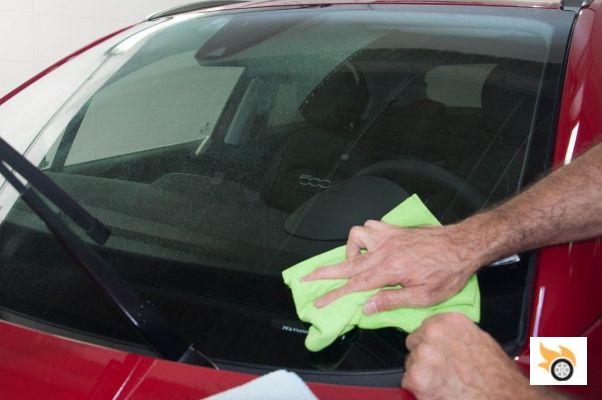
With the crystals, we have two options: try to leave them perfect, or dry them without killing us too much to review them later with a clean dry cloth and glass cleaner. It depends on the hurry you are in.
Seventh step: review of details
If we have left a mosquito without cleaning, or some isolated stain, we can go over it with a clean cloth and Quick Detail, but if it does not come out easily, and before insisting, we will have to investigate what the stain is, to use the most appropriate specific product. With a microfiber cloth (can be one of those that we have used for the bodywork, and that is not too wet) go over a little the tires (using Quick Detail if we have left a dirty area), the door frames, the hood, and taking advantage of some of the wetter cloths, the plastics of the door sills.
The interior
If it is only dusty, and there are no stains, just a microfiber cloth (I often use a microfiber glove, because it is convenient, fast, and you reach the corners well) and some interior cleaning product (please do not use one of those that leave a sticky and shiny finish) and from time to time, go over the grilles, buttons and corners with a brush (I use a makeup brush, which is great).
If there are any stains on plastics or fabric upholstery, use a cloth lightly dampened with APC (it is better to apply the product on the cloth) and rub without fear, you'll be surprised with the result. For the leather, there are specific products, just follow the instructions, and even if it is not visibly dirty, don't forget to clean the steering wheel from time to time. Be careful with Alcantara upholstery, you can't just clean it any old way.
Windows
If you have decided to wipe the windows, use very little product (one wipe is enough for one window) and wipe them with a perfectly clean cloth, using one of its eight sides for each of the windows. Move the cloth quickly over the glass, but don't apply pressure, and stop insisting as soon as you see that the glass is dry. And don't forget that windows have two sides, the inner one also gets dirty... Ideally, use a product with a rain repellent for the outer windows, as it greatly improves visibility when it rains, even when the wiper blades are not working properly or the windscreen wipers have broken down.
Refinishing with Quick Detail or liquid wax
If you want a spectacular result, you can always go over it with a clean, dry cloth and a few sprays of Quick Detail. You have to use little, but enough so that the cloth moves lightly, use it as if it were the typical "Pronto" of the furniture. Another option is to use some kind of liquid wax, which is used as a Quick Detail, and in addition to extra shine, it will add a little bit of protection to the paint.
I admit, this whole process will take you one to two hours, but you will leave your car impeccable, and most importantly, you will not cause any damage to the bodywork, which will remain spotless for many years.
What about those of us who don't have a place at home to wash the car?
I don't have a place at home either, but I'm lucky enough to have a professional detailer in my city, who rents out his boxes equipped with hose, buckets and vacuum cleaner... But if this is not your case, and you have to force yourself to pressure wash, there are a couple of options that, although they won't satisfy the most perfectionist detailers, they serve me as plan B and C, although I must clarify that they are not suitable methods if you decide to wax or seal your car, because the soap of the pressure wash is quite aggressive, and would remove the layer of wax or sealant quickly.
Plan B: One-bucket car wash
Although many car washes prohibit the use of buckets, in some of them you can do it if you go at times when there is not much movement. In that case, it's best to get a bucket with a screw-on lid (they sell them in detailing stores) so that you can take your bucket of soapy water home with you. If you don't have or can't find a bucket, then you know: a normal bucket and a bottle of water... An alternative would be to buy a plastic bottle of water (preferably eight liters) and cut it with a cutter when you get to the car wash, to turn it into an improvised bucket that you can then throw in a yellow container.
The washing process would be the same as the two buckets, except that we will start washing the car with pressurized water, insisting until the car is as clean as possible, and then wash it with our glove or sponge, which we will soak in the bucket with soap and water. The idea is to compensate for the absence of the second bucket, removing as much dirt as possible with the lance.
Plan C: self-washing without a bucket
If, after searching and searching, you haven't found a car wash where you can take your bucket with you, you can use this other procedure, for which you will need a small jug of water (about two or three litres) and a glove or sponge. Fill your jug of water at home, add the soap, load it in the car, and go to a car wash where there is not a long queue...
Wash the car with soapy water under pressure as best as you can, but before rinsing, you will soak the glove with some of the water from the carafe, and you will go over the car, always from top to bottom. The carafe of soapy water will be used to soak the glove from time to time, so that it is always soaked... Of course, when you are done with the glove, you will rinse the car with pressurized water.
A few tips
It is important to wash the car in the shade, firstly, because it will prevent the car from drying out prematurely, and secondly, because a car in the sun heats up, softening the paintwork which becomes more sensitive and easier to damage.
If after washing your car, you find the paint "rough" to the touch, or with some kind of lime stain or something like that, it is likely that your car is "contaminated", a word that in the detailer jargon means that there are dirt particles attached, particles that can not be removed with a normal wash. Do not panic! If this happens to you, I recommend that you go and see a detailer, who will advise you on the most suitable product and process to solve the problem.
Mosquitoes and -above all- bird "gifts" must be removed as soon as possible, as they are acidic and attack the paintwork, leaving marks that are impossible to remove. Remove them by using Quick Detail and a soft microfiber cloth, soaking the "bird droppings" well, and rubbing very gently.
Try to avoid parking under trees, sometimes the resin is very difficult to clean.
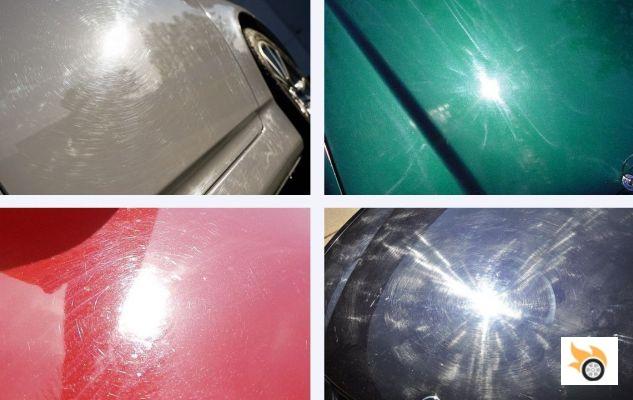
If your car has swirls, don't be in a hurry, most of the time, a professional detailer can remove them by polishing, but I strongly recommend you to avoid going to a professional painter for polishing tasks. Polishing a car needs some technique and experience, and only a good detailer will do a good job. A clean and well cared for paintwork is 95% of a car's appearance, waxes or sealants add the remaining 5%, but they are useless if the paintwork is not spotless, free of contamination and swirls. Waxes or sealers add a little more shine and protection, but for the moment, we will leave them for the "expert" level.
If with a normal wash, the wheels of your car are not clean, you can always use a specific wheel cleaner, but -very important- always follow the manufacturer's instructions, because they are quite aggressive products that can damage the layer of varnish that protects the wheels, and of course, forget about any household product that your sister-in-law may recommend... Both the drying towel and the microfiber cloths can be washed in the washing machine, but instead of fabric softener, use vinegar and they will last a long time. Wash the microfiber cloths after each use, and the towel after several uses.
Enjoy detailing your car
I can only wish you that like me, you enjoy detailing your car, seeing how the years don't go by, and feeling proud when people are amazed at how it looks and shines.
I remember when I sold my previous red MX-5, which I used every day and spent all day sunbathing in the parking lot at work. The man who bought it from me -a nice and perfectionist retired professional classic restorer- told me that it was the car with the best cared paint he had ever seen in his life, and that he couldn't explain how he could have kept the original paint in that state.
Thanks to my friend Xavier Puerto for teaching me a lot of tricks about detailing, and for offering to wash his wife's car for the photo report. And thanks to José Ayuso and the rest of people from Blackdetail for their advice and good work, and for giving us the box to make the report.